Quix: Python stream processing made simple
Quix is a complete platform for building, deploying, and monitoring streaming data pipelines. It enables software developers, data scientists, and data engineers who use Python to focus on app development and extracting value from real-time data pipelines, rather than dealing with the underlying infrastructure.
Streaming data applications, where you need to process time series or event data in order to make decisions in real time, is what Quix is designed for.
With its roots in the demanding world of Formula 1 racing, where performance is paramount, Quix is built to deliver results.
Such intelligent real-time decision making has many use cases, including examples such as increasing engagement with social media and digital content, monitoring vast arrays of sensors, fraud prevention, and of course Formula 1 race car telemetry systems.
Quix has excellent synergy with Machine Learning (ML) systems too. You can quickly deploy your ML model and monitor its performance in real time, modify the model, and redeploy it with a single click.
Start for free
Book a session with us to start for free.
We will create a time-limited free account for you, and our experts will help you get started with your specific use case.
Python stream processing in brief
Briefly, here's how you would build a Python stream processing pipeline with Quix:
- Configure data sources and destinations (see connectors).
- Write your stream processing application in Python using Quix Streams, an open source stream processing client library.
- Deploy your application to production. The application takes input data from a source and transforms it. When stream processing is finished, output data is sent to a destination system.
- Use Quix’s built-in observability tools to continuously monitor your pipeline and quickly identify any issues.
Reducing complexity
Quix is designed to remove as much complexity as possible from the process of creating, deploying, and monitoring your streaming data pipelines.
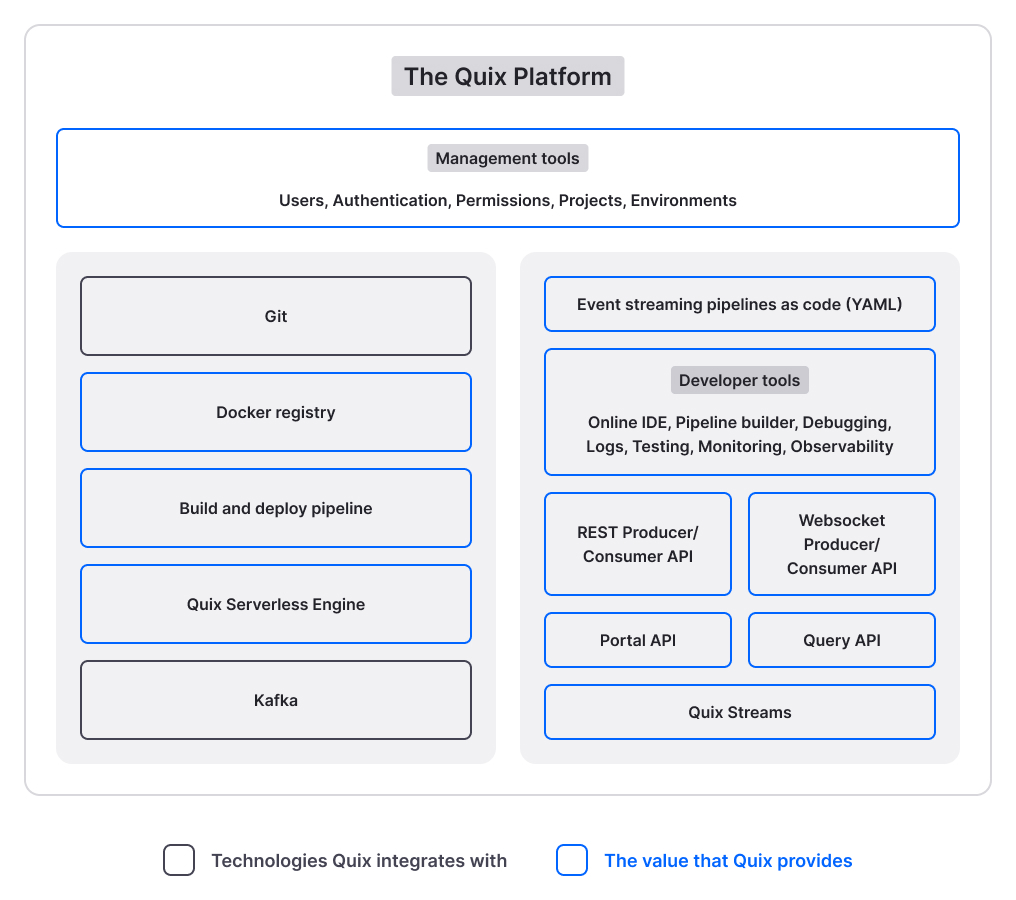
Quix leverages industry-standard technologies, such as Kafka to provide the core functionality for data streaming, Kubernetes for scaling your deployments, Git for revision control, and Python as the main language for programming your solutions.
The following sections take a look at the key components of creating your streaming data solutions:
- Quix Cloud online development platform
- Quix architecture
- Integrating your data with Quix
- Building your Python stream processing pipelines with Quix
- Deploying (and scaling) pipelines
- Monitoring and managing your data
While this short introduction to Quix is intentionally brief, there are abundant links for more detailed information you can follow to increase your knowledge of Quix. Alternatively, simply drop into the Quix Community and ask any question you may have.
Quix Cloud
Quix Cloud provides everything a developer needs to build industrial-strength stream processing applications.
The components that make up the Quix Cloud enable developers to:
- Use a full web-based IDE with version control and logging, to build, deploy, and monitor their Python stream processing applications.
- Have abstracted access to underlying broker infrastructure, including fully-managed Kafka topics.
- Single-click deployment to the Quix serverless compute environment for hosting your web-based real-time streaming applications.
- Connect existing web applications and IoT clients.
In addition to providing a complete solution, Quix also enables you to leverage third-party providers if your use case requires it. For example, while Quix can host all your Git repositories, you can also configure your environments to use third-party providers for this purpose, such as GitHub, Bitbucket, and Azure DevOps.
Similarly, Quix provides Quix-hosted Kafka, but you can also use Confluent Cloud or self-hosted Kafka options.
Quix architecture
This section describes the main technical components and architecture of Quix.
Quix UI
Quix UI strives to present an intuitive software experience that facilitates DevOps/MLOps best practices for development teams. The goals of the Quix UI are to:
- Help a broad spectrum of developers access live data.
- Help developers create and manage complex infrastructure and write application code without support from expert engineering teams.
- Help to accelerate the development lifecycle by enabling developers to test and iterate code in an always-live environment.
To achieve these goals, the Quix UI includes the following features:
-
Online IDE: Develop and run your streaming applications directly in the browser without setting up a local environment.
-
Code Samples: Choose from the prebuilt Code Samples ready to run and deploy from the IDE.
-
Project templates: Open source application templates that demonstrate what’s possible with Quix. You can fork them and use them as a starting point to build your own Python stream processing pipelines.
-
One-click deployments: Configure, deploy, and manage your streaming applications with a simple user interface.
-
Monitoring tools: Monitor the status and data flow of your streaming applications in real time.
-
Broker management: Create, delete, explore and configure your self-hosted message broker infrastructure from the UI.
-
Built-in secrets management: Store the passwords and APIs your stream processing pipelines need securely.
-
Pipeline view: Visualize your pipeline architecture with the information provided from the deployment variables. You can also monitor your pipeline in real time.
-
Live data monitoring: Monitor your application data in real time to test that your code is working as expected.
-
Command-line Interface (CLI): Powerful command-line tool for managing all aspects of your Python stream processing pipelines, including permissions.
Git integration
Quix has the ability to create projects where all code and configuration is contained in a Git repository. This Git repository can be hosted by Quix (using Gitea), or on any third-party Git provider, such as GitHub, or Bitbucket, where you can configure the Quix SSH public key provided to you for Git provider authentication. This helps integrate Quix with your existing workflows.
Kafka integrations
Quix requires a Kafka broker (or a broker compatible with the Apache Kafka broker) to provide streaming infrastructure for your solutions.
When you create a new Quix environment, there are three Kafka broker hosting options:
- Quix Broker - Quix hosts Apache Kafka for you. This is the simplest option as Quix provides hosting and configuration.
- Managed Kafka - use Quix integrations with common Kafka broker hosting providers such as Confluent Cloud, Redpanda, Aiven, and Upstash.
- Self-Hosted Kafka - use your own Apache Kafka broker installation, as long as the cluster is available on the Internet.
This enables you to select a Kafka broker hosting option according to requirements. For example, your production environment may be hosted on your own Kafka infrastructure, while your develop environment is hosted by Quix.
Tip
To get your Python stream processing applications to the testing stage as quickly as possible, the Quix-hosted Kafka option is recommended, as it requires zero configuration to get Kafka running. You can focus on your application code, without needing to do the up front work of creating a powerful scalable Kafka cluster, as that work has already been done for you by Quix.
Read more about selecting your broker option.
Docker integration
When you create an application from a template in Quix, a Dockerfile is provided for you in the build directory of the application. This uses a base image, and additions only need to be made in the case of special requirements, such as to include a library that is not part of the base image. The Dockerfile, combined with your code and configuration, is used to drive the Quix build service, which ensures the generated Docker image is registered with the Quix Docker registry. This image is then submitted to the Quix serverless engine, as part of the deployment process. All this is largely transparent to the developer - you simply click Deploy to build and deploy your application, and then monitor the deployment using the tools provided, such as live data monitoring, logs, CPU monitor, and memory monitor.
Infrastructure as code
When you develop your Python stream processing applications, you build a pipeline of services that can be viewed in Quix. Each service in the pipeline is individually coded, using a standard component, a modified template, or even completely from scratch. Depending on the use case, pipelines can be quite complex, and in the past, this has made them time consuming to recreate. Now Quix supports infrastructure as code. Your entire pipeline can be defined by a single quix.yaml file, and this file can be used to completely and easily reconstruct a pipeline from its corresponding repository.
Integrating your data with Quix
There are various ways to connect your data to Quix. Quix provides a number of connectors that you can use with only some simple configuration. In addition, there are a range of APIs, both REST and WebSockets that are available. There is also the Quix Streams client library, that can be used to get data quickly and easily into Quix.
For a simple example of getting data from your laptop into Quix, see the Quickstart.
Connectors
Quix provides numerous standard connectors for both source, and destination functions. These enable you to easily stream data in and out of Quix. In addition, a number of prebuilt data transforms to perform processing on your streaming data are also available.
Tip
To see available transforms, log into Quix. Open your project, and then an environment, and click on Code Samples. Then under PIPELINE STAGE select Transformation.
APIs
Quix provides several APIs to help you work with streaming data. These include:
- Streaming Reader API: enables you to push live data from a Quix topic to your application, ensuring low latency by avoiding any disk operations.
- Portal API: enables you to automate Quix tasks such as creating environments, topics, and deployments.
Quix Streams
As you will notice as you explore the various open source code samples and connectors that come with Quix, Quix also provides a complete Python client library, Quix Streams, to reduce development times, and provide advanced features such as automatic scaling through Streams.
Using Quix Streams you can rapidly build a Python client that implements your stream processing use case.
Quix Streams is somewhat similar to Kafka Streams, in the sense that both libraries process data from a Kafka topic. However, unlike Kafka Streams, Quix Streams enables you to process data using pure Python.
Python is the dominant language for data science, data engineering, and machine learning, but it needs to be interfaced carefully with streaming technologies, such as Kafka, which are predominantly written in Java and Scala.
For Python developers, the Quix Streams client library can provide streaming data packaged in a data frame, so you can write data processing logic and connect it directly to the abstracted broker. Developers can read about the most important streaming concepts in the Quix Streams introduction.
Quix streams is an open source Python library, and the GitHub repository contains all code and documentation.
Building Python stream processing pipelines with Quix
The basic flow that pipelines follow is ingestion, processing, and serving of data. These correlate to source, transform, and destination components within Quix.
These are described in more detail in the following sections.
Pipelines
Python stream processing applications are implemented by building pipelines consisting of a series of applications deployed to Kafka and Kubernetes clusters. These stream processing pipelines are described by a single YAML file, quix.yaml. With just this file, you can reconstruct any pipeline.
Further, changes in this file in one environment can be merged into another environment, giving you the ability to test changes in one environment, before deploying into another, while the change history is retained in Git.
You can see that a typical pipeline is built from sources, transforms, and destinations.
You can see how to build a simple pipeline in the Quix Cloud Tour.
Multiple environments
In Quix you create a project to contain your Python stream processing application. A project corresponds to a Git repository, either hosted by Quix, or alternatively using an external Git provider such as GitHub. Within a project you can create multiple environments, containing your stream processing pipelines. Each environment is associated with a Git branch, so that you can embrace the full Git workflow, having for example, production, staging and development branches. You can also configure your preferred Kafka hosting option for the environment too, for example you can choose Quix-hosted Kafka, self-hosted Kafka, or Confluent Cloud.
Monitoring and managing your data
Quix provides a suite of tools to enable you to monitor and manage your data. These include:
- Live data monitoring - View your data in real time through topic-based data streams.
- Logs - Real-time logging information is displayed in a console tab. You also have the option of downloading your logs.
- CPU monitor - you can monitor the CPU utilization of your deployment in real time.
- Memory monitor - you can monitor the memory usage of the deployment in real time.
- CLI - a powerful command line interface, see the CLI documentation.
Next steps
- Quickstart - get data into Quix and display it in less than 10 minutes
- Quix Cloud Tour - build a complete pipeline in less than 30 minutes
- Watch a video on the art of the possible with Quix