Create an application
There are various ways to create an application:
- From the
Pipelineview, select+ Add new, and then select the appropriate type - for example, one of: source, external source, transformation, external destination, destination. - From the
Applicationsview, click+ New application. - From the
Code Samplesview, click a suitable code sample as a starting point, for exampleStarter transformation.
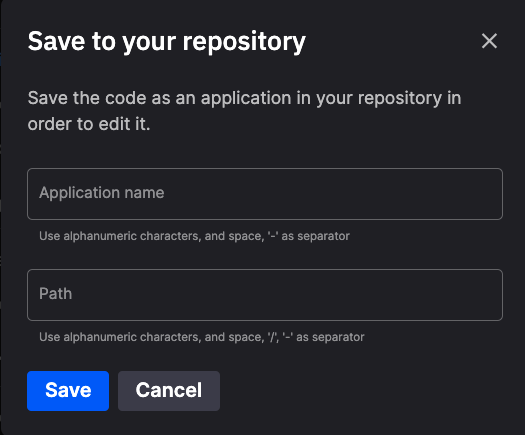
When you create your application, you are prompted for an application name and path:
The application name can be any suitable name, the application path is the folder in which the application is stored in the Git repository.
By default the path is set to be the same as the application name, but you can choose any path name - for example, you might not want to use spaces in folder names, so you use underscores instead of spaces in the path.
By way of example, if you created an application with the name My Application Name, and left the path as the default value, you Git repository would look similar to the following:
Note the path is the same as the application name.
Tip
When you create an application from a code sample, the comment added to the repository displays the code sample that was used as the starting point. In the previous example, the repository comment is "Created from Starter transformation".
Watch a video
See how to create an application:
Transcript
0:01 Hello, welcome back to another video. In this video I'll show you how to get cracking with development and we're going to look at creating an application within our development environment.
0:16 So you can see here a project so far we have, two branches, main and dev, two environments. And we're going to be doing most of our work in the development environment.
0:29 So I'm just going to click on there, go into that. So you can see from these environments up here that the environment that's selected.
0:40 It is the develop environment. You can also see that the production environment is a protected environment. And as further confirmation of where we're working, we can see here that we're in the develop environment with its own pipeline deployments topics and applications.
1:00 Now at the moment, we don't really have anything in our pipeline, just a few tools to get you started potentially.
1:08 We have no deployments. We have no topics and we have no applications. So what I want to do is add a simple.
1:21 Demo data source to create some formula one data. We have a suitable data source that you can use for demonstration purposes.
1:32 So I'm just going to go ahead and use that as a simplest option. It's various ways that I can do that.
1:38 I can click on code samples. And search for the particular thing that I'm looking for, which is demo data. I'm probably going to pick the Python version of that.
1:56 But as you saw here, you can also click on this button here to add a data source. It takes you to the same place and you can, again, filter.
2:07 So I'm going to use this one for demonstration purposes. You can see here that I can preview the code. I can deploy it directly as it is, which is one option.
2:20 If I want to, make some modifications, I can also do that using the web based code editor. So let me show you that click edit code.
2:34 It takes me into the editor. I can see all the files in my application that have been, created for me in this sample.
2:45 And here's the code. I can modify the code. I don't really need to change it, but just to show you that you have an answer here.
2:54 I can modify it. Now I can commit these changes. The other thing I can do is tag the version of my application code.
3:08 So to do that, I'll click on add tag and then pull in tag name. This case, I'm just going to call it v1.
3:17 Now I could potentially run the code. And that's useful for testing purposes. Let me show you what happens if you do that.
3:30 So any packages that are required, such as pandas and so on, will be included in the build. And if a topic needs to be created, that will be done for you as well.
3:47 So in this case, you can see that the topic F1 data is being created for us. And that will happen in the background.
3:57 You can see your topics here and you can see that the F1. One data topic is still being created. So we have confirmation now that that topic has been created.
4:17 We saw the code running. The topic was being created. That's very easy. It's for debugging. But what I actually want to do is deploy this and test it out properly.
4:28 So I will click the deploy. I get this dialogue where I can configure lots of things. I'll only talk about some of the things that you can configure in this video and cover.
4:42 And some other things in further videos. Main thing I want to do here is select the particular version that I've tagged, which is V1.
4:54 I don't really need to change things like CPU, cores, memory, replicas at the moment, because I think these are enough resources for this particular demo.
5:06 And I'm happy with the other default options. So I will click deploy. And now this application will be built and deployed.
5:17 If I look in the pipeline, I can also see that this has been built. Okay, that's it for this video.
5:27 We'll have a look at this particular application, what it does in a subsequent video. Thanks for watching and see you in the next video.


.png)